
C10 Builders Guide: A Comprehensive Restoration Plan
Embark on a detailed C10 journey! This guide covers chassis, engine, bodywork, and electrical systems, utilizing resources like restoration manuals for a successful rebuild.
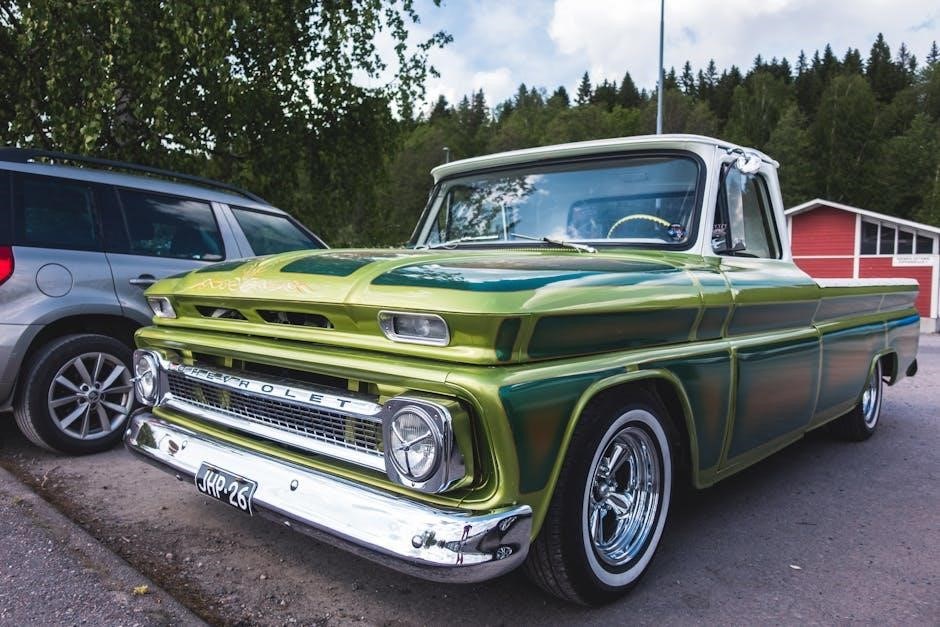
The Chevrolet C10 series, spanning 1967-1972 (and beyond), holds a revered place in automotive history, captivating enthusiasts with its classic design and robust build. Restoring a C10 is a rewarding, yet demanding, undertaking. This guide provides a comprehensive roadmap for navigating the entire process, from initial assessment to final detailing. Whether aiming for a faithful restoration or a modernized restomod, careful planning and execution are crucial.
Resources like “How to Restore Your Chevy Truck” offer invaluable insights into inspection, budgeting, and step-by-step procedures. Embrace the journey, understanding that patience and meticulous attention to detail will yield a stunning, enduring result – a testament to both the truck’s legacy and your dedication.
II. Assessing Your C10: Initial Inspection
A thorough initial inspection is paramount before embarking on any C10 restoration. Begin with a comprehensive assessment of the frame, meticulously checking for rust, bends, or previous repairs. Examine the body panels for corrosion, dents, and alignment issues. Scrutinize the engine and drivetrain for signs of wear or damage.
“How to Restore Your Chevy Truck” emphasizes the importance of accurate assessment. Document all findings with photographs and detailed notes. This initial evaluation will inform your budget, prioritize repairs, and guide your restoration strategy, ensuring a realistic and successful project outcome.
III. Budgeting for Your C10 Build

Creating a realistic budget is crucial for a successful C10 restoration. Begin by categorizing expenses: parts, labor (if applicable), paint, bodywork, and unexpected costs – always allocate a contingency fund! Prioritize essential repairs (frame, brakes, engine) over cosmetic enhancements initially.
“How to Restore Your Chevy Truck” highlights the need for accurate budgeting. Research part prices extensively, considering online marketplaces and salvage yards. Track all spending meticulously; A well-defined budget prevents financial strain and ensures you can complete your C10 project without compromising quality or scope.
IV. Chassis Restoration
A solid chassis is the foundation of any C10 restoration. Thoroughly inspect the frame for rust, damage, or previous repairs – addressing these issues is paramount. Repair or replace sections as needed, ensuring structural integrity. Next, focus on the suspension overhaul, replacing worn components like springs, shocks, and bushings.
Prioritize a clean chassis with new parts and upgrades while the truck is disassembled. Consider modernizing the suspension for improved handling and ride quality. A robust chassis ensures safety, longevity, and enhances the overall driving experience of your restored C10.
A. Frame Inspection and Repair
Begin with a meticulous frame inspection, carefully examining all areas for rust, cracks, or bends. Pay close attention to common weak points like spring hangers and body mount locations. Utilize wire brushes and scrapers to remove existing rust, revealing the extent of the damage.
For minor rust, metal patching or welding may suffice. However, severely compromised sections necessitate complete frame rail replacement. Ensure all repairs meet safety standards and maintain the frame’s original geometry. Proper frame repair is crucial for a safe and structurally sound C10 restoration.
B. Suspension Overhaul
A complete suspension overhaul is vital for restoring ride quality and handling. Begin by disassembling all components – springs, shocks, control arms, and steering linkages. Thoroughly inspect each part for wear, damage, or fatigue. Replace worn bushings, ball joints, and tie rod ends with high-quality replacements.
Consider upgrading to modern suspension components for improved performance. Options include lowering springs, adjustable shocks, and sway bars. Ensure proper alignment after reassembly to maximize handling and tire life. A well-executed suspension overhaul dramatically enhances the driving experience.
V. Engine Rebuild or Replacement
Deciding between a rebuild or replacement is crucial. Original engines offer authenticity, but may require extensive work. A rebuild involves disassembling, inspecting, and replacing worn components like pistons, bearings, and valves. Modern engine swaps provide increased power and reliability, though sacrificing originality.
Carefully assess your budget and goals. A professionally rebuilt engine is costly, while a crate engine offers convenience. Consider factors like fuel efficiency and desired performance levels. Thorough research and planning are essential for a successful engine project, ensuring a dependable powertrain.
A. Engine Options: Original vs. Modern
Choosing between original and modern engines defines your C10’s character. Original engines – typically small-block V8s or inline-sixes – maintain historical accuracy, appealing to purists. However, they may lack modern performance and efficiency. Modern options, like LS-series V8s, offer substantial power upgrades and improved fuel economy.
Consider the trade-offs carefully. Swapping requires modifications to the engine mounts, wiring harness, and potentially the transmission. Original rebuilds demand sourcing correct parts and specialized knowledge. Weigh authenticity against practicality and performance to align with your vision.
B. Performance Upgrades
Elevate your C10’s capabilities with strategic performance upgrades. For enhanced power, consider aftermarket cylinder heads, camshafts, and intake manifolds. A performance carburetor or fuel injection system optimizes air-fuel delivery. Upgrading the ignition system with electronic distributors and higher-output coils improves reliability and spark.
Don’t neglect supporting modifications. A high-flow exhaust system reduces backpressure, while upgraded cooling systems prevent overheating. Strengthening the drivetrain with a performance transmission and rear end ensures durability. Carefully plan upgrades to achieve a balanced and reliable performance increase.
VI. Drivetrain Restoration
A robust drivetrain is crucial for a dependable C10. Begin with a thorough inspection of the transmission – rebuild or replace as needed, addressing worn gears and seals. Next, service the differential and rear end, checking for proper gear mesh and fluid leaks. Consider upgrading to a more durable rear end ratio for improved performance.

Don’t overlook the driveshaft and U-joints. Ensure they are balanced and in good condition to prevent vibrations. Inspect and replace any worn components. A properly restored drivetrain ensures smooth power delivery and long-lasting reliability, enhancing the overall driving experience.
A. Transmission Rebuild or Replacement
The C10’s transmission requires careful attention. A complete teardown and inspection are essential to assess wear and damage. Worn gears, clutches, and seals must be replaced with high-quality components. Consider a professional rebuild for optimal performance and longevity, ensuring correct assembly and adjustments.
If the transmission is severely damaged, replacement might be more cost-effective. Explore options like a rebuilt unit or a modern upgrade for improved reliability and shifting. Proper installation and fluid filling are critical for smooth operation. A well-maintained transmission is vital for a pleasurable driving experience.
B. Differential and Rear End Service
The rear end is crucial for power delivery. Thoroughly inspect the differential for leaks, worn bearings, and damaged gears. Drain and replace the gear oil with the correct viscosity, and examine the limited-slip additive if equipped. Inspect and replace worn U-joints and axle seals to prevent leaks and ensure smooth operation.
Consider upgrading to a stronger rear end if planning significant power increases. A complete rebuild or replacement with a modern unit can enhance durability and performance. Proper setup and backlash adjustment are vital for quiet operation and longevity.
VII. Bodywork and Metal Fabrication
Addressing rust is paramount in C10 restoration. Begin with a comprehensive inspection, identifying all areas of corrosion. Employ techniques like media blasting, chemical stripping, or sanding to remove rust down to bare metal. Patch panels are often necessary, requiring welding skills and precise fitting.

Panel alignment is critical for a quality finish. Ensure doors, fenders, and the hood fit correctly before proceeding; Metal fabrication skills are invaluable for creating custom parts or repairing severely damaged sections. Prioritize structural integrity during all repairs.
A. Rust Repair Techniques
Effective rust repair is crucial for a lasting C10 restoration. Methods range from simple surface treatments to extensive metal replacement. Media blasting removes rust and paint, revealing the extent of damage. Chemical treatments convert rust into a stable compound. Patch panels, welded into place, address larger areas of corrosion.
Cutting and welding require skill and precision. Ensure proper metal preparation and use appropriate welding techniques. Consider rust converters for areas inaccessible for welding. Thoroughly treat all repaired areas with rust preventative coatings to inhibit future corrosion.
B. Panel Replacement and Alignment
Precise panel replacement is vital for a visually appealing C10. Begin by carefully removing damaged panels, preserving surrounding metal whenever possible. New panels should be trial-fitted for accurate gaps and alignment before welding. Utilize shrinking and stretching techniques to conform panels to the body’s curves.
Welding should be done in stages to minimize distortion. Employ body hammers and dollies to refine panel shapes. Proper alignment ensures doors, hood, and fenders function smoothly. A quality paint job relies on flawless panel fitment, enhancing the truck’s overall restoration.
VIII. Paint and Body Preparation
Achieving a show-quality finish begins with meticulous body preparation. Thoroughly remove all rust, old paint, and contaminants. Address any dents or imperfections with body filler, ensuring smooth transitions. Multiple coats of primer are crucial, building a solid foundation for the final paint layers.
Sanding between primer coats is essential for a flawless surface. Choose a paint system suited to your desired look – basecoat/clearcoat offers durability and shine. Proper masking and a clean environment prevent imperfections. Quality preparation guarantees a long-lasting, beautiful paint job.
A. Choosing the Right Paint System
Selecting the ideal paint system is pivotal for a lasting finish. Consider your budget, desired aesthetic, and skill level. Single-stage paints are simpler to apply but offer less UV protection. Basecoat/clearcoat systems provide superior durability, gloss, and color depth, though requiring more expertise.
Acrylic urethane and epoxy primers offer excellent adhesion and corrosion resistance. Research paint brands and color options thoroughly. Factor in the cost of materials, including reducers, hardeners, and clear coats. A well-chosen system ensures a professional, enduring result.
B. Primer Application and Sanding
Proper primer application is crucial for paint adhesion and a flawless finish. Apply several thin coats, allowing each to dry completely before the next. Ensure consistent coverage, avoiding runs or sags; Utilize a high-build primer to fill minor imperfections.
Sanding is equally vital. Begin with coarser grit (e.g., 320) to level the primer, then progress to finer grits (e.g., 400-600) for smoothness. Wet sanding minimizes dust. Thoroughly clean the surface before painting to remove all sanding residue, guaranteeing optimal paint bonding.
IX. Electrical System Rewiring
Rewiring is often essential during C10 restoration, addressing aged and potentially unsafe wiring. Begin with a comprehensive understanding of original wiring diagrams – crucial for correct component placement. Consider modern upgrades like LED lighting for efficiency and aesthetics, alongside a modern stereo system with satellite audio capabilities.
Full system replacement is recommended. Utilize quality wiring harnesses and connectors. Integrating air conditioning requires dedicated wiring and relays. Dennis W. Parks’ guide offers detailed instructions for safely and effectively rewiring your C10, ensuring a reliable electrical system.
A. Understanding C10 Wiring Diagrams
Decoding the C10’s electrical system begins with mastering its wiring diagrams. These schematics illustrate the complex network of wires, connections, and components. Accurate interpretation is vital for identifying circuits, troubleshooting issues, and ensuring correct reassembly during restoration.
Original diagrams can be found in factory service manuals. Pay close attention to color codes and wire routing. When integrating modern components, understand how they interface with the existing system. Dennis W. Parks’ book provides practical guidance on reading and applying these diagrams effectively, minimizing errors.
B. Modern Electrical Component Integration (LEDs, Stereo)
Upgrading the C10’s electrical system offers enhanced functionality and convenience. Integrating LEDs provides brighter, more efficient lighting, while a modern stereo system delivers superior audio; However, careful planning is crucial to avoid overloading the original wiring.
Consider adding relays for high-draw accessories. Ensure compatibility with the existing voltage and grounding system. Dennis W. Parks’ guide details integrating features like satellite audio and LEDs. Proper wiring practices, including fusing, are essential for safety and reliability during this modernization process.
X. Interior Restoration
Reviving the C10’s interior brings back its original charm and comfort. This phase involves addressing seat upholstery, potentially requiring complete replacement or careful restoration of existing materials. The dashboard and gauges demand attention, often needing repair, refinishing, or sourcing replacements to ensure accurate functionality.
Consider the desired level of originality versus modern comfort. New carpeting, door panels, and headliners contribute significantly to the overall aesthetic. Thorough cleaning and detailing of all interior components are vital for a high-quality finish, enhancing the driving experience.
A. Seat Upholstery and Replacement
The condition of the C10’s seats greatly impacts the interior’s overall appearance. A thorough assessment is crucial: can the original upholstery be salvaged with cleaning and repair, or is complete replacement necessary? If replacing, choose materials that match the truck’s era and style, considering vinyl, cloth, or leather options.

Professional upholstery services offer expertise in pattern matching and installation. DIY enthusiasts can tackle this project with the right tools and patience, but achieving a factory-quality finish requires skill. Don’t forget the underlying foam and springs – these often need replacement for optimal comfort.
B. Dashboard and Gauge Restoration
The dashboard and gauges are focal points of the C10’s interior, demanding careful attention during restoration. Cracks, fading, and broken components are common issues. Begin by disassembling the dashboard, meticulously labeling each part for reassembly. Inspect the underlying structure for damage and repair as needed.
Gauge restoration involves cleaning, lubricating, and potentially replacing internal components. Consider upgrading to modern gauges for improved accuracy and features, while maintaining a vintage aesthetic. Refinishing the dashboard with appropriate paints or veneers will restore its original luster, completing the interior’s transformation;
XI. Brake System Upgrade
Prioritizing safety, a brake system upgrade is crucial for any C10 restoration. Original drum brakes often lack the stopping power desired for modern driving conditions. A disc brake conversion significantly enhances performance and provides a more confident braking experience.
This involves replacing the front and potentially rear drums with disc brake assemblies. Don’t forget to replace all brake lines with new, DOT-approved lines to ensure reliability. Thoroughly bleed the system after installation. Upgrading the master cylinder is also recommended for optimal braking force and control.
A. Disc Brake Conversion
Converting to disc brakes dramatically improves stopping power and safety. Kits are readily available, offering complete solutions for both front and rear conversions. These typically include rotors, calipers, brackets, and necessary hardware. Careful consideration should be given to rotor size and caliper style based on wheel size and intended use.
Proper installation is paramount; ensure correct alignment and torque specifications are followed. Upgrading the master cylinder to match the increased hydraulic demand of the disc brakes is essential. Don’t overlook the importance of quality brake pads and thoroughly bleeding the system post-installation.
B. Brake Line Replacement

Replacing original brake lines is a crucial safety measure during restoration. Decades of corrosion can weaken lines, leading to potential failures; Utilize pre-bent stainless steel lines for a precise fit and superior durability. Carefully flare and connect new lines, ensuring leak-proof seals at all fittings.
Double-flare tools are recommended for creating reliable connections. When routing new lines, meticulously follow the original paths to avoid interference with other components. Thoroughly bleed the entire brake system after line replacement to eliminate air bubbles and guarantee optimal braking performance.
XII. Steering System Restoration
A responsive steering system is vital for safety and driving enjoyment. Begin with a thorough inspection of all components: the steering box, pitman arm, idler arm, tie rods, and ball joints. Replace worn or damaged parts with quality replacements. Rebuild the steering box if feasible, or consider a modern power steering conversion for improved ease of use.
Ensure proper alignment after any steering component replacement. Inspect and replace the steering column bearings and universal joints. Lubricate all moving parts to reduce friction and ensure smooth operation. A restored steering system will dramatically enhance the driving experience.
XIII. Bed Restoration (Wood or Metal)
The truck bed often requires significant attention during restoration. Determine if your C10 originally had a wood or metal bed; some models featured wood planks over a metal frame. For wood beds, carefully remove and inspect each plank, replacing any rotten or damaged pieces. Thoroughly sand and refinish the wood, applying a protective sealant.
Metal beds need rust repair and potentially panel replacement. Ensure the bed floor is solid and structurally sound. Consider bed liner options for added durability and protection against future damage. A beautifully restored bed completes the C10’s overall appearance.
XIV. Air Conditioning Installation
Adding air conditioning significantly enhances comfort, especially in warmer climates. Since many C10s didn’t originally include factory AC, this often involves a complete system installation. This includes the compressor, condenser, evaporator, hoses, and wiring. Carefully route the components, avoiding interference with other systems.
Proper wiring is crucial, referencing diagrams for correct connections. Modern AC systems offer improved efficiency and reliability. Ensure the engine can handle the added load, and consider upgrading the radiator if necessary for optimal cooling performance.
XV. Sourcing Parts for Your C10
Finding C10 parts requires a multi-faceted approach. Online marketplaces like eBay and dedicated classic truck parts retailers offer a vast selection, both new and used. Local salvage yards can be treasure troves for hard-to-find components, but require diligent searching and inspection.
Networking with other C10 enthusiasts through online forums can uncover leads on rare parts. Be prepared for potential shipping costs and lead times, especially for specialized items. Prioritize quality and compatibility when selecting parts to ensure a successful restoration.
A. Online Marketplaces
Online marketplaces are a cornerstone of C10 parts sourcing. Platforms like eBay Motors and specialized classic truck parts websites offer extensive inventories. Expect a wide range of prices and conditions, from pristine original parts to affordable used options.
Carefully review seller ratings and descriptions before purchasing. Factor in shipping costs, which can significantly impact the overall price. Utilize search filters to narrow down results based on year, model, and specific part requirements. Patience and diligent searching are key to finding the best deals.
B. Local Salvage Yards
Don’t overlook the potential of local salvage yards! These can be treasure troves for hard-to-find C10 parts, often at significantly lower prices than online marketplaces. Be prepared to do some digging and potentially some disassembly yourself.

Bring tools and wear appropriate safety gear when visiting salvage yards. Inspect parts thoroughly for rust, damage, and usability. Networking with yard owners can alert you to incoming C10s. Patience and a willingness to get your hands dirty can yield substantial savings and unique finds.
XVI. Tools and Equipment Needed
A comprehensive C10 restoration demands a well-equipped workspace. Essential tools include a full socket set, wrenches (both standard and metric), screwdrivers, and various pliers. Welding equipment is crucial for rust repair and fabrication. Air tools, like an impact wrench and sander, significantly speed up tasks.
Specialty tools such as a ball joint separator, compression tester, and timing light are also beneficial. Don’t forget safety equipment: gloves, eye protection, and a respirator. A good floor jack and jack stands are non-negotiable for safe vehicle support.
XVII. Step-by-Step Restoration Process
Begin with a thorough disassembly, meticulously documenting each part’s location. Next, focus on chassis restoration – frame repair, suspension overhaul, and brake system upgrades. Simultaneously, address the engine and drivetrain, rebuilding or replacing components as needed. Bodywork follows, tackling rust repair and panel alignment before paint preparation.
Rewire the electrical system, then reinstall the interior, ensuring all gauges and features function correctly. Finally, complete finishing touches and detailing. Prioritize a logical sequence, referencing restoration guides for optimal results.
XVIII. Common C10 Restoration Challenges
Rust is a prevalent issue, particularly in the cab corners, floor pans, and bed. Sourcing original parts can prove difficult, often requiring extensive searching through online marketplaces and salvage yards. Electrical system complexities, especially with older wiring, present another hurdle. Accurate budgeting is crucial, as unexpected costs frequently arise during the restoration process.
Panel alignment can be time-consuming, demanding patience and precision. Maintaining originality versus incorporating modern upgrades also poses a challenge, requiring careful consideration of your restoration goals.
XIX. Safety Precautions During Restoration
Prioritize personal protective equipment (PPE): wear safety glasses, gloves, and respirators when welding, sanding, or working with chemicals. Ensure a well-ventilated workspace, especially during painting and bodywork. Use jack stands securely when working under the vehicle – never rely solely on a jack.
Disconnect the battery before tackling any electrical work. Handle fuel and brake lines with extreme caution, avoiding open flames. Properly dispose of hazardous materials like old oil and coolant. Be mindful of lifting heavy components, utilizing appropriate equipment and assistance.
XX. Documentation and Record Keeping
Meticulous records are crucial! Document every step of the restoration process with detailed notes, photographs, and receipts. Create a dedicated folder (physical or digital) to store all information. Track parts purchased, costs incurred, and labor hours invested. This documentation will be invaluable for future maintenance, appraisals, and potential resale.
Maintain a parts inventory and catalog any modifications made. Diagrams and wiring schematics should be carefully preserved. Detailed records demonstrate the quality and thoroughness of your restoration, enhancing the vehicle’s value and historical significance.
XXI. Resources: Books and Online Forums
Knowledge is power! Utilize resources like “How to Restore Your Chevy Truck: 1973-1987” for comprehensive guidance. “How to Wire Chevy & GMC Trucks: 1947-1987” is essential for electrical work. Online forums dedicated to C10 restorations offer a wealth of information and community support.
Engage with experienced restorers, share your progress, and seek advice. Websites and social media groups provide access to parts, technical expertise, and inspiration. These resources will accelerate your learning curve and help overcome restoration challenges effectively.
XXII. Finishing Touches and Detailing
Elevate your C10’s appearance! Consider preserving the original patina with a clear coat, embracing imperfections for a unique character. Carefully assess bed restoration – wood or metal – based on originality and preference. Attention to detail matters; restore or replace emblems, trim, and glass.
Polishing, waxing, and interior cleaning will enhance the final result. Ensure all components function flawlessly. These finishing touches transform a restored truck into a stunning showcase of craftsmanship and dedication, truly reflecting your vision.
XXIII. Post-Restoration Maintenance
Preserve your investment! Regular maintenance is crucial after a C10 restoration. Implement a schedule for oil changes, fluid checks, and lubrication of all moving parts. Inspect brake lines, hoses, and belts frequently for wear and tear. Address any rust spots immediately to prevent further corrosion.
Monitor electrical connections and ensure proper function of all systems. Periodic washing and waxing will protect the paint. Consistent care guarantees years of enjoyment and maintains the truck’s value, honoring the restoration effort.
XXIV. Enjoying Your Restored C10
Reap the rewards of your labor! After a meticulous restoration, it’s time to savor your classic C10. Participate in car shows to showcase your work and connect with fellow enthusiasts. Embrace the unique driving experience – these trucks offer a connection to a simpler era.
Don’t be afraid to drive it! Regular use prevents stagnation and allows you to fully appreciate the restoration. Remember, it’s a truck built for enjoyment, so create lasting memories behind the wheel.